Configure Your Task Flow
Introduction
Task Flows are are a set of steps (represented by a series of screens) that help a user accomplish a task and represent how a user progresses through a UI. STRUDEL has several Task Flow templates that built into a the starter app. In this example, you will work with the Task Flow called "Explore Data". Let's configure this Task Flow so that users can search and filter data about planets in the Solar System.
Remove Unused Task Flows
Before we start working with the Explore Data Task Flow, let's remove the Task Flows that we aren't going to be working with. Go to the src/pages directory and delete the following folders (don't worry, you can bring them back using the command-line later if you wish):
compare-datacontribute-datamonitor-activitiesplaygroundrun-computationsearch-data-repositories
To re-add or duplicate a Task Flow, you can navigate to the src/pages directory and run:
npx degit strudel-science/strudel-kit/src/pages/TASK-FLOW-NAME
Rename Your Task Flow
Let's rename the Explore Data Task Flow something that is more appropriate for our example. Inside the src/pages directory, rename the explore-data directory solar-system. Doing this will change the URL route to this Task Flow's page. It will also update the link to the Task Flow on the home page. You should now be able to navigate to your Task Flow template at http://localhost:5175/solar-system.
If you followed that link, you will be taken to the default Explore Data page. Right now it is configured with default data and settings. Let's keep going to configure this Task Flow for own usecase.
Task Flow Breakdown
Let's look at the contents of src/pages/solar-system, the directory that holds the Explore Data Task Flow template:
solar-system
├── -components
│  ├── DataView.tsx # Data grid component
│  ├── DataViewHeader.tsx # Header above data table
│  ├── FiltersPanel.tsx # Left side panel of filters
│  └── PreviewPanel.tsx # Panel displayable on row-click
├── -tests
│  └── explore-data.cy.ts # End-to-end test for this Task Flow
├── $id.tsx # Detail page for a single row
└── index.tsx # Data explorer page
There are three types of files in this template:
- Page components
- Sub-components
- Tests
The page components are the files that aren't inside a directory prefixed with -. In this template that includes $id.tsx and index.tsx. These define the pages and URL routes that exist in our application. The strudel-kit uses TanStack Router to handle this. You may find it useful to scan their documentation and conventions.
Sub-components are the files nested inside of the -components directory. These are pieces of pages that are broken into their own files for brevity. Typically these are used inside page components.
The last type of file in this template is a test. This tests the basic functionality and flow of the Task Flow.
You can read more about the structure of Task Flow templates on the Task Flows Overview page in the strudel-kit docs.
Add a Data Source
Right now the Task Flow you created is pulling its data from the public/dummy-data/ directory. Let's instead create a new new data file that we will use for our Task Flow.
Open up a blank file and paste in the following content:
Name,Diameter,Mass,Inclination,Eccentricity,Semi_majorAxis,SurfaceGravity,OrbitalPeriod,SiderealRotation,Satellites
Mercury,4879.4, 3.302×10^23, 7.004, 0.20563593, 0.38709927, 3.7, 0.241, 58.65, 0
Venus,12103.6, 4.869×10^24, 3.39471, 0.00677672, 0.72333566, 8.87, 0.615, 243.0187, 0
Earth,12756.3, 5.974×10^24, 0.00005, 0.01671123, 1.00000261, 9.78, 1, 0.997271, 1
Mars,6794.4, 6.419×10^23, 1.85061, 0.0933941, 1.52371034, 3.71, 1.881, 1.02595, 2
Jupiter,142984, 1.899×10^27, 1.3053, 0.04838624, 5.202887, 24.79, 11.86, 0.4135, 63
Saturn,120536, 5.688×10^26, 2.48446, 0.05386179, 9.53667594, 8.96, 29.46, 0.4264, 64
Uranus,51118, 8.683×10^25, 0.774, 0.04725744, 19.18916464, 7.77, 84.01, 0.7181, 27
Neptune,49572, 1.024×10^26, 1.76917, 0.00859048, 30.06992276, 11, 164.79, 0.6712, 14
Save this file in public/data and name it planets.csv.
Edit the Task Flow Data Source
Now you need to tell the Task Flow to use the new data source you just created. For this template, the data source is referenced inside the file solar-system/-components/DataView.tsx.
The primary configurable portions of a Task Flow template are marked with comments that say CUSTOMIZE:. You might find it useful to do a project-wide search for this phrase when you are setting up a new Task Flow.
Inside DataView.tsx, locate the following line of code:
dataSource: 'dummy-data/exoplanets.csv',
Now change this to reflect the path to your newly created CSV file:
dataSource: 'data/planets.csv',
Then locate dataIdField and change this to Name (the unique column in your new dataset):
const dataIdField = 'Id';
Becomes:
const dataIdField = 'Name';
Now instead of pointing to the default dataset, your Task Flow points to the planets dataset you made. Next, we need to change the page titles, table columns, and filters for the main index page.
Modify Page Elements
Let's first start simple by changing the page titles for this Task Flow.
Page Titles
Open up src/pages/solar-system/index.tsx. This is the initial page of the Task Flow. Scan this file for the <PageHeader /> component:
<PageHeader
  // CUSTOMIZE: the page title
  pageTitle="Explore Data App"
  // CUSTOMIZE: the page description
  description="Description of this app"
  sx={{
    marginBottom: 1,
    padding: 2,
  }}
/>
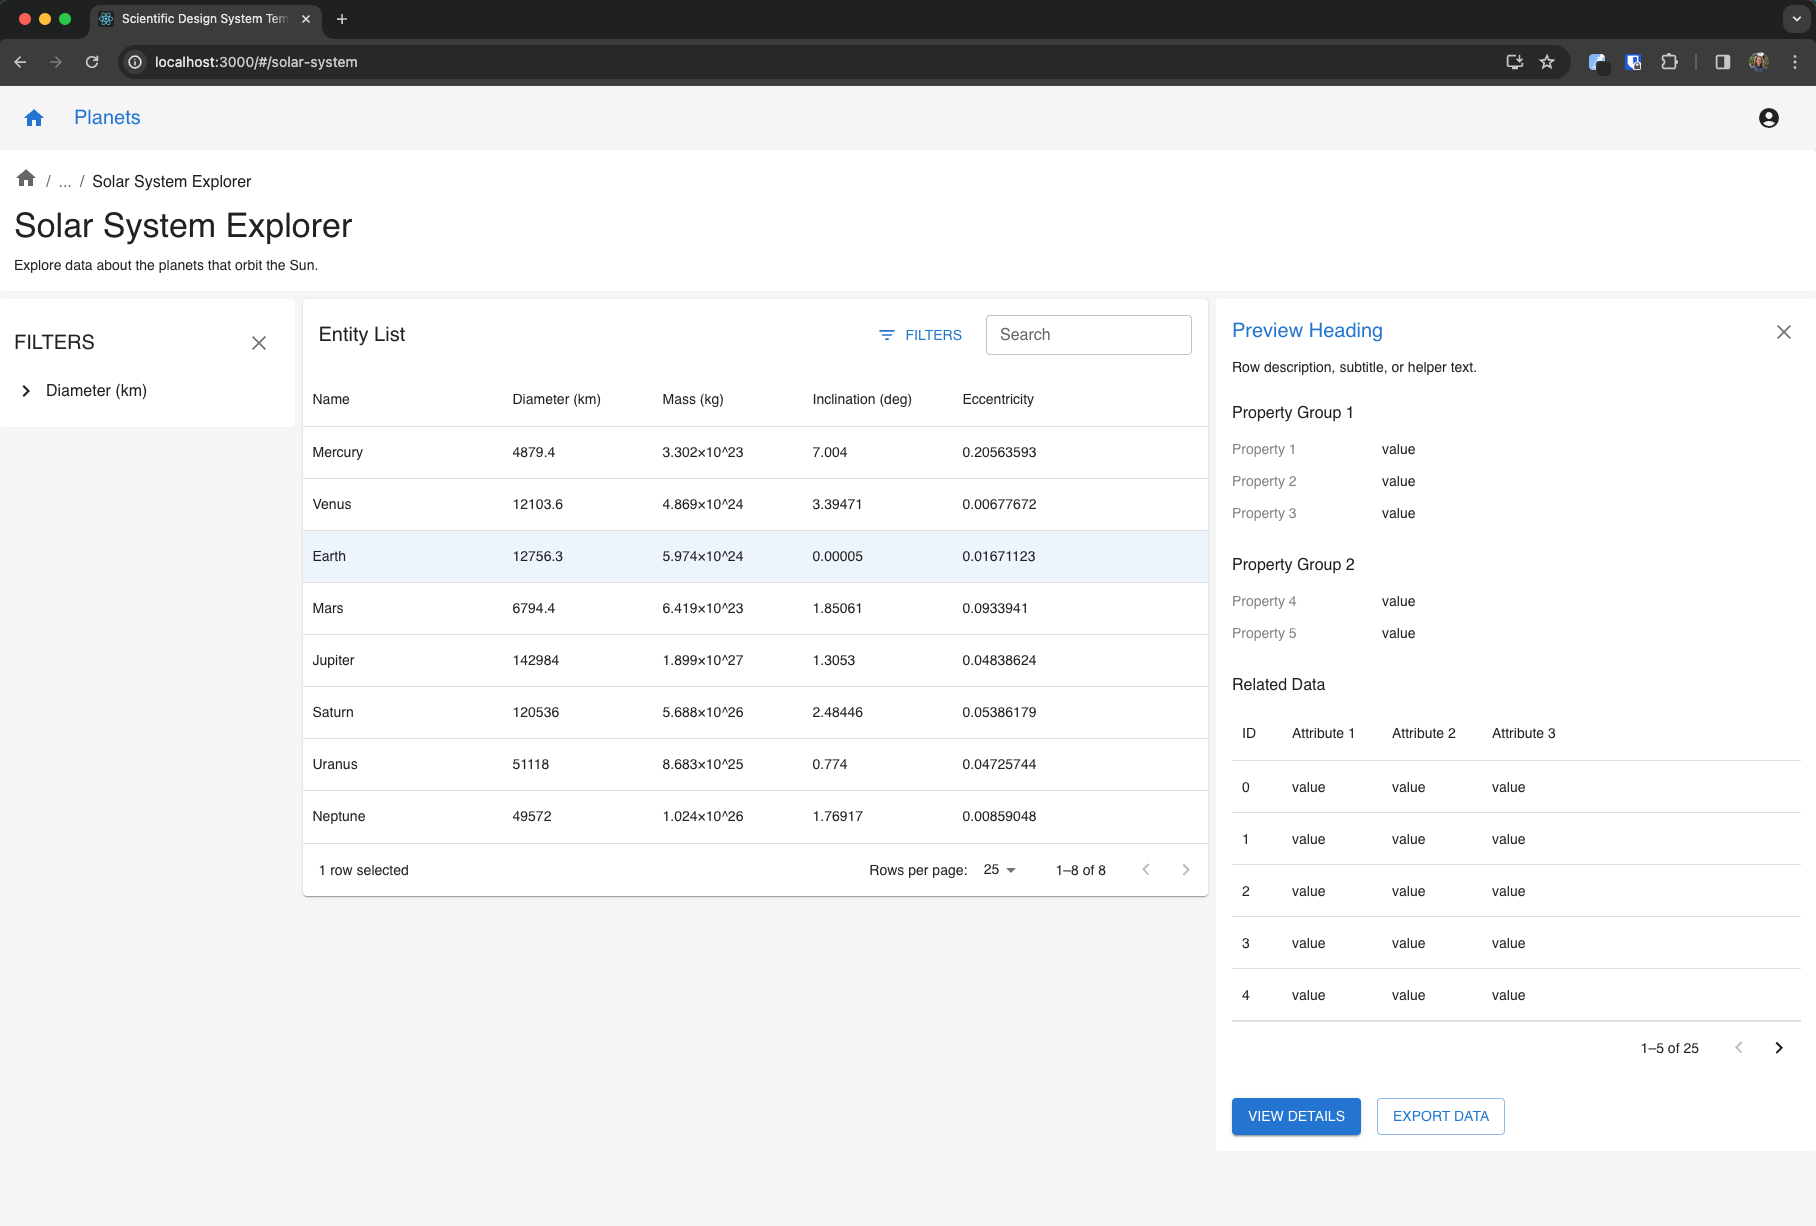
Replace the pageTitle prop value with "Solar System Explorer" and the description prop value with "Explore data about the planets that orbit the Sun.".
A prop is like an input or argument for a React component. They are used to make components more reusable and dynamic.
Your component should now look like this:
<PageHeader
  // CUSTOMIZE: the page title
  pageTitle="Solar System Explorer"
  // CUSTOMIZE: the page description
  description="Explore data about the planets that orbit the Sun."
  sx={{
    marginBottom: 1,
    padding: 2,
  }}
/>
Save this file and you should see the new page titles in your browser at http://localhost:5175/solar-system.
Filters
The filters are also defined in the index.tsx file so keep that file open for this next step. Locate the array towards the top of the file called filterConfigs. This array defines which filters to render, how they should render, and how they should connect to the data.
Replace that whole array definition with one that works with our new data source:
// CUSTOMIZE: the filter definitions
const filterConfigs: FilterConfig[] = [
  {
    field: "Diameter",
    label: "Diameter (km)",
    filterComponent: "Slider",
    filterProps: {
      min: 4000,
      max: 150000
    }
  }
];
Save this file and you should see the new filter in your browser at http://localhost:5175/solar-system.
Columns
The columns to display in the table are defined in the DataView.tsx component inside the -components directory (the same one where we defined the data source). Open up that file and locate the <SciDataGrid /> component.
Inside this component is a prop called columns. Replace the value of this prop with an array of column definitions for our new dataset:
// CUSTOMIZE: the table columns
columns={[
  {
    field: "Name",
    headerName: "Name",
    width: 200
  },
  {
    field: "Diameter",
    headerName: "Diameter (km)",
    width: 150
  },
  {
    field: "Mass",
    headerName: "Mass (kg)",
    width: 150
  },
  {
    field: "Inclination",
    headerName: "Inclination (deg)",
    width: 150
  },
  {
    field: "Eccentricity",
    headerName: "Eccentricity",
    width: 150
  }
]}
Save this file and you should see the new columns show up in the table in your browser at http://localhost:5175/solar-system.
You should now have a fully functioning Explore Data Task Flow page when you navigate to the /solar-system route!
This is great, but it would be good to be able to access this page from the navbar instead. Let's add a link to the Solar System page in the top navigation bar.
Update the Navigation Bar
Open the file located at src/components/TopBar.tsx. This component controls the contents of the top navigation bar.
Locate the last closing </AppLink> and add another <AppLink> component directly after:
<AppLink to="/solar-system">Solar System</AppLink>
You may also want to update the title in the previous <AppLink> to say something other than "My Project":
<AppLink to="/">
  <Typography variant="h6" component="div" fontWeight="bold">
    Planets
  </Typography>
</AppLink>
To do this we are going to open the global strudel configuration file strudel.config.ts located at the root of our app.
Save that file and you should see a new "Solar System" link in the navbar.
Woohoo! You now have your first fully connected Task Flow.
Next steps
The next section provides some examples of how to customize your Task Flow.